War Caches
Warning: Doing War Caches as a hardcore character is extremely dangerous, as you will not be able to easily get help retrieving your gear. Also, dying in a war cache as a fairy will still send you to Fae Realm unless you have a Fairy Soul Anchor. Given this information, doing War Caches as a hardcore fairy player without a lot of preparation means you will likely effectively permanently lose your gear.
| War Caches
| |
|---|---|
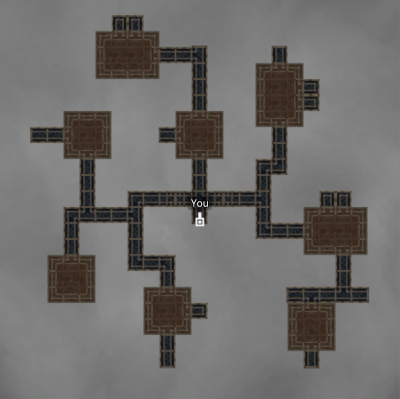 Map of War Caches (click for larger size)
| |
| Connects to | |
| Area Level | 50 - 60
|
| File:War CachesPlayerMap.png Portal or entrance caption.
| |
War Caches are small dungeons found in the Ilmari Desert that can be reached by taking quests given by Sir Johnson.
Each unique War Cache will have a code identifier in the quest log. (e.g. "S-2" or "T-1")
- Drug (D) War Caches usually contain Rakshasa.
- Flood (F) War Caches often have partial or completely flooded floors. Fire Mages may find their spells mostly useless here.
- Mummy (M) War Caches are known to have the Undead Mummy creatures inside. Be extremely careful of these floors as mummies can inflict multiple complex curses.
- Scorpion (S) War Caches often contain Smallish Scorpions. These arthropods are Nigh Invulnerable Until Knocked Back.
- Tornado (T) War Caches often have wind-related monsters inside.
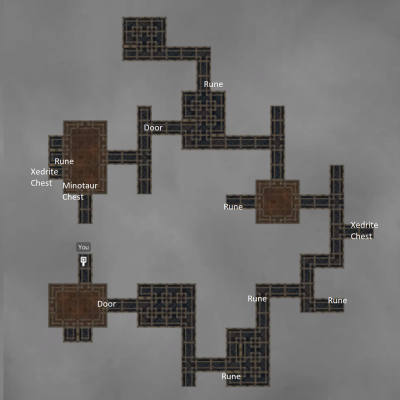
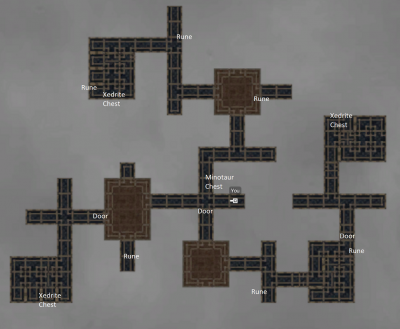
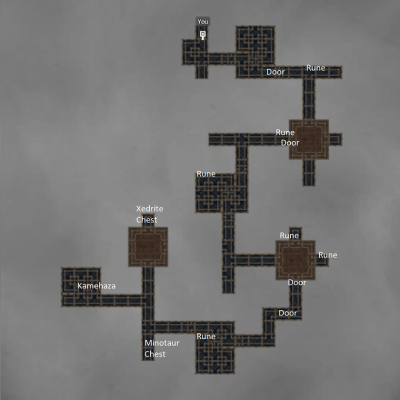
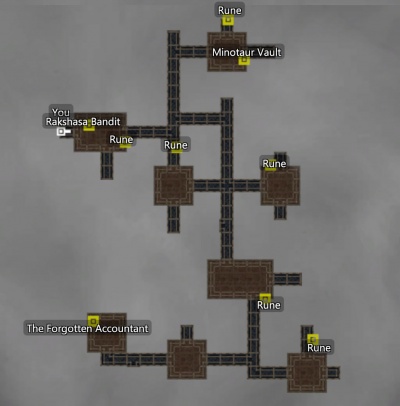
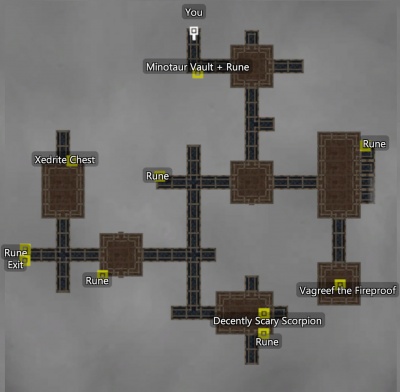
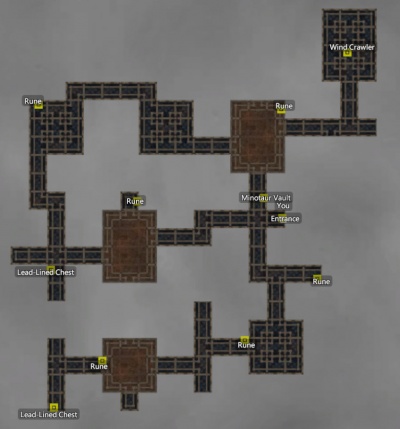
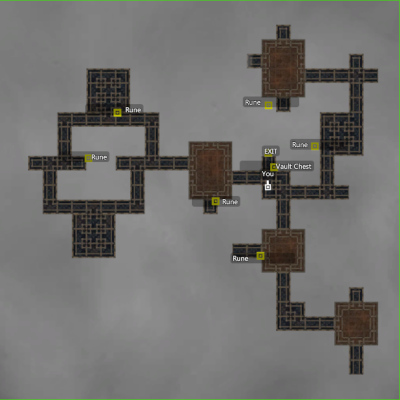
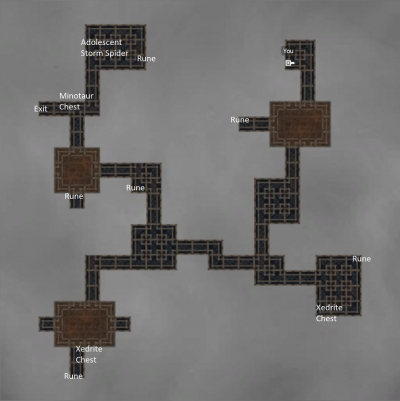
Each time a player visits a War Cache, the map will appear fogged, and no Cartography experience will be given for exploration. However, each War Cache will have the same map layout and location of chests, bosses, and rune clues.
To begin another War Cache you must wait 20 minutes from when you received the previous map.
After receiving a War Cache map from Sir Johnson, choosing to abort the quest will delete the map from the player's inventory. War cache maps that are dropped on ground are unusable except by the original owner.
Ilmari War Cache Dungeons
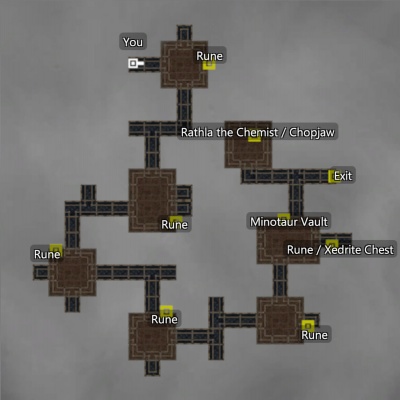
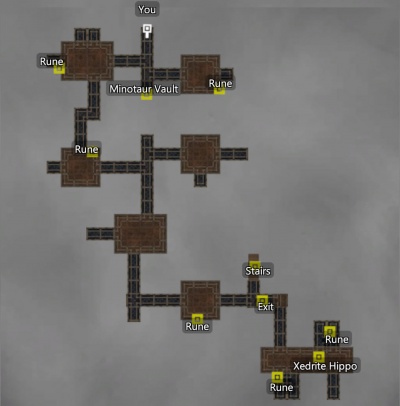
War Cache D-1
“Here's your next map. A new gang of bandits moved into the area, so make yourself useful and figure out what they're up to. And get my xedrite too, obviously.
Click Expand to view the map for War Cache D-1
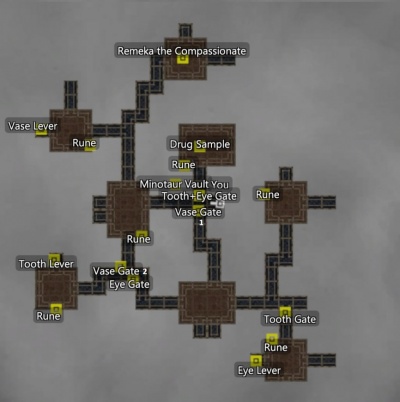
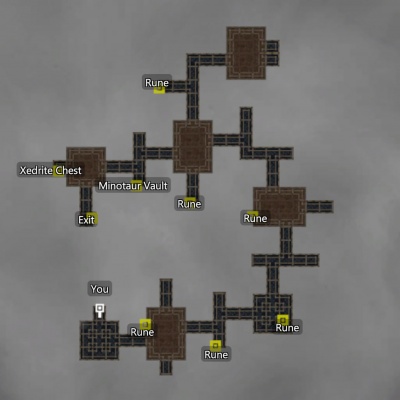
War Cache D-2
“Remember those drug-manufacturing rakkies you found? Well, I've been hearing more rumors about it. It sounds powerful. Could be an alchemical recipe we could use in the Council military. Here's a map to a hole without any Xedrite in it. But it's in the same general area as that gang. I'm guessing it'll be swarming with the kitties, so be careful. Get in there and steal me a clean sample of the drug.
Click Expand to view the map for War Cache D-2
- Disclaimer: Other people in the cache with you can mess up the sequence
- • Drug-Test Animal (Cow), Drug-Test Animal (Deer), Drug Chemist, Remeka the Compassionate
- • The combined Tooth/Eye gate at entry will be the last one you do – some of the gates are already open on entry
- • Run through the open vase 1 to the NE room, get the rune and recall beginnings
- • Run WNW, get the 2 runes and deal with Remeka if desired
- • Use the vase lever to open vase gate 2 (and closing vase gate 1) – get the rune in SW room – recall beginnings
- • Run W then SE through the (open) vase and eye gates (W and S from entry)
- • Run E through to get the next rune and use the eye lever – recall beginnings
- • Head W then S back through the vase gate and use the tooth lever to open the tooth/eye gate. Recall beginnings and the last room should be open
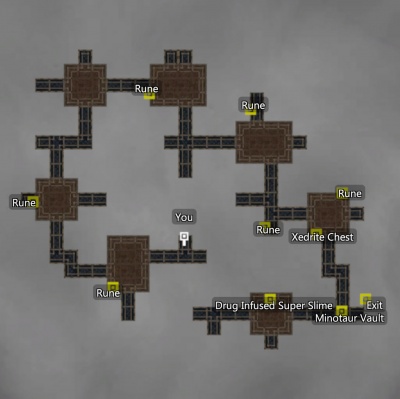
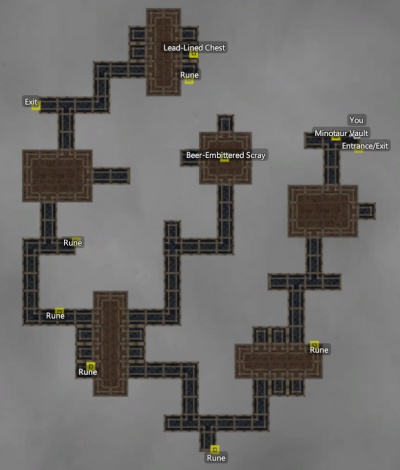
War Cache D-3
“Here's the map for your next assignment. And you might want to hurry, I've had reports of smoke, screams, and commotion coming from there today.
Click Expand to view the map for War Cache D-3
Drinking from the cauldron will cause an Obedient Acid Slime pet to incubate, required for slaying the Mutated Test Subjects found inside.
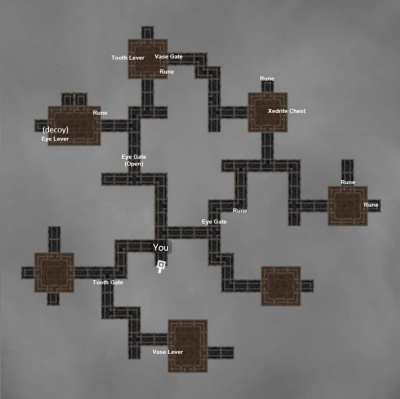
War Cache D-4
“So the drug you found out there, that Telka's Tits or whatever... it's garbage. Only works on rakkies! Most worthless drug since I got my hands on 'bounceweed'. But there's good news: the stuff is made from the silk of the rare giant sand worm, and we think other, better drugs could be made from the same stuff. And I have a lead on a cache infested with 'em! If we're lucky, you can get some samples of their silk while you're getting my xedrite. Before you leave, go see if the Sand Seer has any advice for ya on Sand Worm killin'. Or just take my advice: use archery. But no, no, the elf woman's gotta make it more complicated than that!
Click Expand to view the map for War Cache D-4
- • Drug Chemist, Drug-Test Animal (Cow), Drug-Test Animal (Deer), Sand Worm
- • Head north from entry through the (open) eye gate. Ignore the eye lever. Grab the 2 NW runes then use the tooth lever – recall beginnings
- • Run through the tooth gate to use the vase lever – recall beginnings
- • Head N again thru the (open) eye gate to the open vase gate - catch the remaining runes, xedrite and sand worms
War Cache F-1
“I've got a nice easy one for you. Here's the map to the war cache. We believe the cache was originally located in a Crone military city called New Argolis. Well, not really a city, more like a recreational area for off-duty Hegemony troops. Should be pretty safe. The report says there's some weird animals in there, but no bandits. Follow the map, get in, find the Weaponized Xedrite, and get out. Don't screw up! You've only got one chance -- you won't be able to get back in a second time.
Click Expand to view the map for War Cache F-1
- • Angry Giant Bat, Deinonychus, Viper, Xedrite-Sickened Cave Hippo
- • Angry Giant Bats in this cache can infect you with Fevered Trismus
- • Occasionally you'll be stunned from unseen critters in the ceiling
War Cache F-2
“We've found another war cache in the region that used to be 'New Argolis'. It wasn't on the front lines. Hegemony troops went there for booze and whores. So there shouldn't be any spike traps or death beams or anything. Nice and easy! In fact, I almost gave this job to my second-best finder, Kella, so I could save you for the hard ones. But she declined it... so it's all yours. She said the area is full of snakes, and she's afraid of snakes. Whoever heard of a rakkie that's afraid of snakes? What is this world coming to, I ask you? Anyway, I guess she might know what she's talking about. Bring some antivenom.
Click Expand to view the map for War Cache F-2
War Cache F-3
“I've got a real easy one for you! This one's in the remains of 'New Argolis', the old R&R camp for Hegemony soldiers during the war. The Seer didn't go in, of course, but she said it smells like beer in there. I can't imagine it's still drinkable, though. Remember: wine ages, but beer just goes bad after a few decades. Don't make yourself sick!
Click Expand to view the map for War Cache F-3
War Cache F-4
“Here's the map to your next mission. It used to be a holding cell for war prisoners. It sounds like it's been flooded for a while, which means the bandits will have moved on, but I'm sure there's snakes and other dumb animals in there. Oh, and ghosts. Ghosts always show up in military prisons... you're not scared of ghosts, are you? I just give 'em a stunning bash with my shield. That shuts 'em up.
Click Expand to view the map for War Cache F-4
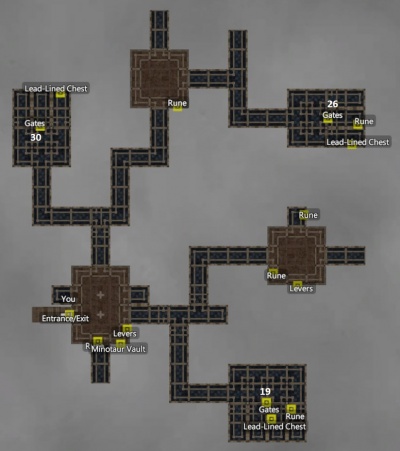
- The xedrite chests and runes are behind the numbered gates (19, 30, 26).
- • Viper, Megatriffid, Ghostly Prisoner
- • South Gate 19: Use the first set of levers. From left to right - pull 2nd lever once and 3rd lever once. Get the xedrite and rune and recall beginnings
- • Reset levers to zero: still showing 19 – pull 3rd then 2nd levers to reset to zero
- • West Gate 30: head to the east levers and pull: 2nd, 4th, 3rd (should come up 30), recall beginnings and do the 30 gate area – recall beginnings
- • North Gate 26: head back to levers at the entry – should still be showing 30. Pull 4th and then 3rd lever. Should come up as 26.
War Cache M-1
“I hope you're not afraid of mummies. I need you to go into a mummy-infested hole and get some xedrite. My other finders have chickened out, but you're better than them! You've got this! Here's the map!
Oh, better have the Sand Seer brief you on mummies first. It's good to refresh the brain!
The Sand Seer's Comment
He wants me to brief you on MUMMIES? I'm not a mummy expert! But I can repeat what I've read in books, I guess.
Mummies are nasty undead that are supposedly not being created anymore... although I'm pretty sure that's untrue. Anyway, the mummies you'll be facing are very old, and they have old diseases that your body has few protections against. So try not to inhale near them.
Their organs are removed during the creation process, so don't bother trying to poison them, bludgeon them, or make them bleed. Their thick bandages give them protection against blades and arrows, too. Fire is the classic weapon of choice, but acid and lightning also work well, and I've heard they're even susceptible to psychic blasts, which is unusual for undead.
That's about all I can remember about mummies, aside from historical info. Good luck.
Click Expand to view the map for War Cache M-1
- Mummy Rotter, Mummy Wrapper, Gaz-Urak, Ancient Hook Beast, Arbulekh
- Gates are timed so you may have to run through the buttons more than once
- Door 1 (2 gates): Press the button on the N wall, then 2nd button is in the open store room directly across. After going thru the open gates, a button there opens them again if you need it
- Door 2 (3 gates) – facing N:
- o Button 6 on the left opens 1 gate
- o Button 2 on the right opens 1 gate
- o Button 7 on the right opens 1 gate
- Door 3 (4 gates):
- o After getting the 4th rune, head north to get the 5th rune and deal with Arbulekh (northern most room) if desired
- o Run back to the E/W hallway facing W.
- o Facing W there is an open arch with a crypt leaning on the left and a skull button on the right. Ignore that button – go past the open arch, turn around (facing E) and use that button
- o In the main part of the adjacent room, press the S button.
- o Turn back to the W and run around to the open arch, using the left button opens 1 gate
- o Straight ahead to door 3 and the right button opens remaining gates (sometimes it may just open 1 gate – have to hit all these buttons quickly)
War Cache M-2
“Got a big ole' mummy-infested deathtrap for ya. Lots of xedrite though! I've already sent someone into this one and she came back empty-handed, sayin' it was too dangerous. So I tell ya what, I'll throw in a little something extra if you can get all three pieces. Just don't die over it!
Click Expand to view the map for War Cache M-2
- • Mummy Wrapper, Mummy Rotter, Snow Leaper, Ghoul, Ghoul Smasher, Explosion Trap
- • Skull Buttons with flame results are not the right ones and will reset the doors
- • Buttons with glowy results are correct
- • The gates will close after a short time in this cache
- • The buttons also seem to be timed, may have to run through a sequence more than once
- • Once you pass through a gate, all doors have a button to open it again on the back
- • If someone else is in the cache, it may be best to log and wait until you’re alone
- Door 1 (W and S from entry) – four buttons:
- • R top, R bottom, L bottom, L top
- • Get the 1st rune
- Door 2 (E from first door) – four buttons to open this door. The buttons for this door seem to be timed:
- • From the 1st rune - the first button is dead ahead by an open gate (should be facing east)
- • Second button is by the 2nd rune
- • Third button is left of door 2 (should be facing north) (you can ignore the right button by door 2)
- • For the last button run west from door 2, then south – button is by the open arch
- • Get the xedrite and recall beginnings
- Door 3 (full W from entry) – opens in this order (can ignore all the E and W buttons):
- • Right button on the S wall
- • Right button on the N wall
- • Left button on the N wall
- • Left button on the S wall
- • Get the xedrite and recall beginnings
- Door 4 (N from entry) – only 1 button to deal with - opens easily without any sequencing or button combos.Ignore the skull buttons in this room.
War Cache M-3
“This hole's near the other mummy-pits, so be on your guard. Could be mummies or other nasty undead.
Warning about monsters in M-3
Click Expand to view the map for War Cache M-3
- Warning: Visage of Demise possible starting after door 2. Watch for green mist. Hook beasts and mummies will call them for help so deal with the Visage first.
- • Visage of Demise, Mummy Rotter, Mummy Wrapper, Ancient Hook Beast, Sand Dog
- Door 1 (2 doors) – this sequence opens both doors:
- • top right button
- • bottom right
- • top left
- • bottom left
- Door 2 (two doors separated by a short hallway). You’ll need to open the first door and probably stay in the hallway until it closes. You can open again from the 3 buttons on the other side (top-middle-bottom). Then do the door at the end of the hallway
- • First door –
- o red button on right of door
- o N red button
- o S white button
- o bottom left button by the doors
- o top left
- o wait in the hallway until the door closes (or close the door – 1st button), then open it again and do the sequence for the 2nd door
- • Second door: You can lure mobs into the hallway if necessary so you can stay in the hallway. With the first door open –
- o In the room - Red button right of the door that just opened
- o N red button in the room and run back through the still open doors
- o Lone red button in the hallway to open the 2nd door 2.
- Door 3:
- • White button by door
- • White W button
- • Red E button
- • Red S button
- • Green E button
- • Green S button
- • White button by the door
- • White W button
- • Other south white button (not by the door though)
- • (has 3 buttons on the other side to open it again – top, middle, bottom)
- Door 4 (two doors)(red and green buttons). You’ll need to keep door 3 open – or open again (1st, 2nd, 3rd button):
- • Red E button (in the previous room)
- • Red button by door 3
- • Red button by door 4 (opens 1 door)
- • Green E in previous room
- • Green S in previous room
- • Green button by door 4 (opens the 2nd door)
War Cache S-1
“Let's get right to work. The Sand Seer has located a new war cache entrance. Follow this map. Remember: the entrance isn't stable. You should be able to get inside and back out again, but don't expect to be able to go back a second time! The hole will collapse quickly. So you have one shot to get my Weaponized Xedrite! This seems like a pretty straightforward one. Just get in, get my Xedrite, and get out without being buried in the sand.
Click Expand to view the map for War Cache S-1
War Cache S-2
“I've talked with my informants about those scorpions you found. And they WERE keeping secrets from me! Apparently scorpion poison is very valuable on the rakkie bandit market, so they've been keeping their existence secret from me. Like I give a fuck about poison glands! I just want the weaponized xedrite. Working with me should be a win-win! Why are they hiding this?! I convinced them to give me the location of another scorpion-filled pit. You're the only agent I trust in this desert -- aside from the Seer, of course -- so this one's all yours. There are two objectives this time: get my xedrite, and also get me a sample from one of these scorpions. Look for a decently scary-looking one, kill it, and bring back... well, just bring the whole thing back, I guess. The Seer wants to examine it. You should expect scorpions, of course, but I wouldn't be surprised if there were bandits in there, too. Be ready for anything! Here's the map. Get me my xedrite!
Click Expand to view the map for War Cache S-2
War Cache S-3
“The Sand Seer examined the scorpion remains you brought back, and she found something interesting. That scorpion's carapace was infused with xedrite! She thinks xedrite dust got into their shells or something. I don't buy it. We need a lot more information. It took some bribery, but I got the location of another scorpion-filled pit for you. There's no xedrite in this one. Just go in, kill every scorpion, and bring me back those carapaces.
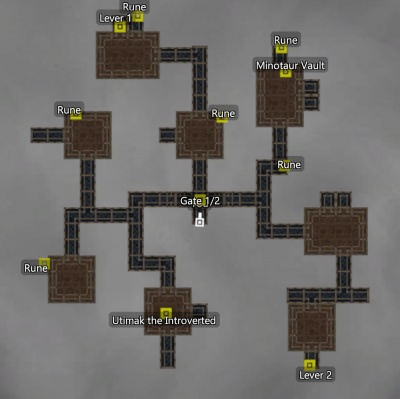
Click Expand to view the map for War Cache S-3
- • Brain Beast, Smallish Scorpion, Utimak The Introverted
- • On entry both doors are shut
- • Go north to use lever 1 to open that gate – recall beginnings
- • At entry, the right gate is now open to allow you to use lever 2 to open the other gate – recall beginnings
- • Once both gates are open, they remain open unless you pull their levers again.
War Cache S-4
“Remember those xedrite-laced scorpion corpses you brought back? Well, that xedrite is useless. It's just raw metal infused into their shells. I need weapons-grade xedrite! However, the Seer thinks there's weaponized xedrite involved. She asked for an agent to undergo an extremely dangerous assignment. So I told her you'd be right over! Here's your map. See her for further briefing.
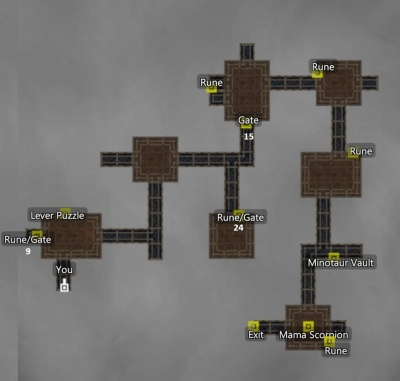
Click Expand to view the map for War Cache S-4
- • Smallish Scorpion, Sand Dog, Mama Scorpion
- • Three numbered gates (9,15,24)
- • The levers should show 0 on entry to the dungeon.
- • Best to do gate 15 last since that route has most of what you want to finish.
- • As you open a gate, others close; but none of the gates are timed
- Door 9: pull to equal 9 (from left to right - 4th lever, 3rd, 2nd, 1st will equal 9)
- Door 24: 9 should still be showing – pull the 5th lever, then 2nd lever (24 should be showing now) – get the rune and recall beginnings
- Door 15: 24 should still be showing – pull 3rd, 5th, then 2nd
War Cache T-1
“This one might be tricky. The Sand Seer insists this area of the desert has "unusual isolated weather patterns". What kind of patterns, you ask? Wind storms. Wind storms! Those are completely natural for the Ilmari! But she's an elf. They're supposed to be sensitive to nature, or whatever. Anyway I hired her for her expertise, so I'd be a fool to ignore her. Here's the map. The Seer will brief you further. We've detected a lot of xedrite in this one, so do whatever it takes!
Click Expand to view the map for War Cache T-1
War Cache T-2
“We've got another war cache in that problematic spider area. The Sand Seer wants you to collect some legs from those wind spiders while you're in there. Here's the map. Remember: spider legs are great and all, but don't leave without my Weaponized Xedrite!
Click Expand to view the map for War Cache T-2
War Cache T-3
“Got another spider-hole for you. No xedrite detected, though, so you're not going in for that. You're going in because the Sand Seer needs more spider legs or something. I'm starting to regret listening to her about this... but she says it might be a huge crisis, so now I can't just tell her to ignore it! Do whatever she needs, and try to be quick about it. We've got xedrite to find!
The Sand Seer's Comment
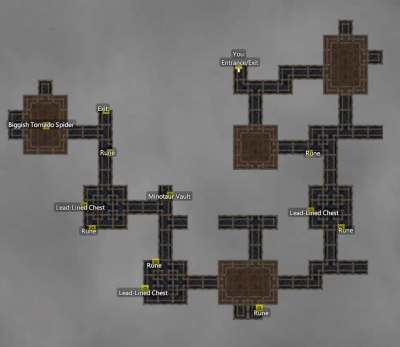
He assigned you again? Good. I've got bad news and worse news. The bad news is those spiders you found are definitely tornado spiders, and the infestation is already too deep. There's no hope of really being rid of them, but maybe we can keep them contained to a small part of the desert.
Now here's the worse news: tornado spiders are the weak ones. When an infestation of tornado spiders gets large enough, they somehow spontaneously start laying eggs for the REAL dangerous spiders, the Hurricane Spiders. And those eggs have been spotted in the hole you're headed to.
Go in and burn those eggs. And I mean that literally: you should be prepared to burn them! They're very difficult to damage with weapons, and they regenerate health like crazy unless they're on fire. If you can't manage any other type of fire, I noticed the fairy has some Trollbane Oil for sale in the 'commissary'. That will at least keep them from regenerating! Good luck.
Click Expand to view the map for War Cache T-3
War Cache T-4
“You're finally back. Been saving this one for you! I sent my second-best xedrite-finder in already, and she came back empty-handed and mostly-dead. So it's time to show 'em why you're the best! There's xedrite in there, plus some big bug the Sand Seer wants killed. Go talk to her first.
The Sand Seer's Comment
Remember how I told you that 'tornado spiders' are the weak ones, and it was very important to destroy all the giant eggs before they became much bigger problems? Well, we found another cave where an egg already hatched, and we've got a much bigger problem. But it's still an adolescent, so there might be time left to kill it!
It will have extreme regeneration, just as it did in the egg: you'll need to light it on fire to prevent that. Fortunately, weapons work better than they do on the egg, but there's an extra complication: this spider has a very venomous bite!
Kella was sent in before you and nearly died. Don't underestimate this one.
Click Expand to view the map for War Cache T-4
Points of Interest
Minotaur Vault
Each War Cache contains one Minotaur Vault, a special type of chest that may be opened by solving a code breaking puzzle. See Safecracking for more details.
Rune Clues
There are 12 possible runes for the Minotaur Vault, but only six will be used for a given puzzle. These are labeled on wall decorations. The rune clues and vault solution are instanced per player. See Safecracking for more information.
War Cache Inhabitants
Friends
Extension:DynamicPageList (DPL), version 2.3.0 : Warning: No results.
